


Adresse
1 rue de Saint-Petersbourg75008 Paris
Mail
contact@bam.techTéléphone
+33 (0)1 53 24 00 83Personally, I have an interest for Augmented Reality. Thus, I spend some of my free time browsing the web for information on the subject. This is when I found a video that teaches you how to detect objects on a webcam in React.
As a React Native developer, I wanted to recreate the same result on my phone, so that I could detect object in my environment and then put 3D items on the screen according to what was detected. Little did I know that it was the beginning to my troubles. Here is a summary of what I have learned along the way, a list of the different steps to code real time object recognition and a git repository to follow along.
The answer stands in TensorflowJs. This library provides a set of tools to run artificial intelligence in JavaScript. You should therefore begin your journey by installing:
To analyse your environment, you will need an entry, that is your phone's camera. The idea is to install a library that renders a preview of your camera stream and allows you to capture it. I am personally using expo-camera but if you are not on expo, I would recommend react-native-camera. ++code>++/code>
++pre>++code data-line-start="1" data-line-end="46">import React, { useState, useEffect } from 'react';
import { StyleSheet, View } from 'react-native';
import { Camera } from 'expo-camera';
export default function App() {
const [hasPermission, setHasPermission] = useState<null | boolean>(null);
useEffect(() => {
(async () => {
const { status } = await Camera.requestPermissionsAsync();
setHasPermission(status === 'granted');
})();
}, []);
if (hasPermission === null) {
return <View />;
}
if (hasPermission === false) {
return <Text>No access to camera</Text>;
}
return (
<View style={styles.container}>
<Camera
style={styles.camera}
type={Camera.Constants.Type.back}
/>
</View>
);
}
const styles = StyleSheet.create({
container: {
flex: 1,
},
camera:{
flex: 1,
},
});++/code>++code>++/code>++/pre>
With that code, you should either see through your camera or visualise a text in case you have not authorised the access to the camera. If you end in the second scenario, it means that you have not click on "accept" when your phone has ask you for the permission. Change the parameters of your application directly in the settings of your device or delete the application and reinstall it to reinitialise the request.
On top of your camera, you need to use Tensorflow's extended camera that will transform your camera's stream to AI approved material. Initialise const TensorCamera = cameraWithTensors(Camera); and then use it as your new camera component.
++pre>++code data-line-start="1" data-line-end="21">// new imports
import * as tf from "@tensorflow/tfjs";
import { cameraWithTensors } from '@tensorflow/tfjs-react-native';
// initialisation of the new camera outside of the component
const TensorCamera = cameraWithTensors(Camera);
// replace the Camera component by
<TensorCamera
style={styles.camera}
type={Camera.Constants.Type.back}
onReady={() => {}}
resizeHeight={200}
resizeWidth={152}
resizeDepth={3}
autorender={true}
cameraTextureHeight={textureDims.height}
cameraTextureWidth={textureDims.width}
/>++/code>++/pre>
Here, I have decided to keep the values given in the documentation of tfjs-react-native for AI related properties. My goal was not to go into details but rather to use available technologies. Playing with those parameters can be done in a second approach for AI optimisation: resize* properties are related to tensors which are arrays composed of the data to feed to the AI model.
However, make sure to give true to the property autorender so that your Tensorflow keeps your camera in real time.
Finally, the texture dimensions are the dimensions of your device and depends on the OS (iOS or android). You can define those dimensions thanks to React Native's Platform element.
++pre>++code data-line-start="1" data-line-end="21">import { Platform } from 'react-native';
const textureDims = Platform.OS === 'ios' ?
{
height: 1920,
width: 1080,
} :
{
height: 1200,
width: 1600,
};++/code>++/pre>
You may have noticed that I deliberately put an empty function in the property onReady. This is what we will focus on now: what do we do with the camera's stream?
Our goal is to take a snapshot of the camera each x frame and to pass it to Tensorflow which will recognise different objects on the taken image. To do so, we need a pre-trained model that will process a photo to predict which object appears on it. Let me introduce you to the library @tensorflow-models/mobilenet which provides a model that has been trained on 150,000 photographs classified into 1,000 categories: this give us a good starting point. Initialise Tensorflow and load the model after verifying the access permissions of the camera.
++pre>++code data-line-start="1" data-line-end="38">import * as mobilenet from '@tensorflow-models/mobilenet';
const initialiseTensorflow = async () => {
await tf.ready();
tf.getBackend();
}
export default function App() {
const [hasPermission, setHasPermission] = useState<null | boolean>(null);
const [net, setNet] = useState<mobilenet.MobileNet>();
useEffect(() => {
(async () => {
const { status } = await Camera.requestPermissionsAsync();
setHasPermission(status === 'granted');
// initialise Tensorflow
await initialiseTensorflow();
// load the model
setNet(await mobilenet.load());
})();
}, []);
if (hasPermission === null) {
return <View />;
}
if (hasPermission === false) {
return <Text>No access to camera</Text>;
}
if(!net){
return <Text>Model not loaded</Text>;
}
return (
<View style={styles.container}>
...
</View>
);
}++/code>++/pre>
Now that your model is loaded, you are all set to code onReady function. The first argument of this function is your camera stream. You want to get an image from your stream (++code data-line-start="1" data-line-end="13">images.next().value++/code>), perform the classification with your model (++code data-line-start="1" data-line-end="13">net.classify++/code>) and visualise your results with console.log or by using a react state to print them on your screen.
++pre>++code data-line-start="1" data-line-end="13">const handleCameraStream =(images:IterableIterator<tf.Tensor3D>) => {
const loop = async () => {
if(net) {
const nextImageTensor = images.next().value;
if(nextImageTensor) {
const objects = await net.classify(nextImageTensor);
console.log(objects.map(object => object.className));
tf.dispose([nextImageTensor]);
}
}
requestAnimationFrame(loop);
}
loop();
}++/code>++/pre>
In addition, calling tf.dispose on the created tensor images allows you to clean your memory.
Finally, I am wrapping the whole process into a loop (requestAnimationFrame will call your function again) so that it is computed for each frame and stays in real time.
If you followed all the steps until now, you should have a working solution but which is freezing a lot. I personally did not reach a perfectly smooth answer, but with these two optimisation I attained a reasonable result.
BEFORE

AFTER
First, instead of favouring the accuracy of the model, you can decide to favour its speed. For this, simply exchange
++pre>setNet(await mobilenet.load());++/pre>
with
++pre>setNet(await mobilenet.load({version: 1, alpha: 0.25}));++/pre>
As you can see on the gif, the objects are still recognised, but with a lower accuracy. For instance, the sunglasses are at first considered as a bow tie. However the model is much faster because it is less complex. You can play on the numbers to find a good compromise (more information on the options).
Second, you can decide to compute the recognition every x frame instead of each frame. Performing fewer computations means using fewer phone resources and coming across fewer freezing moments. ++code data-line-start="1" data-line-end="20">++/code>
++pre>++code data-line-start="1" data-line-end="20">let frame = 0;
const computeRecognitionEveryNFrames = 60;
const handleCameraStream = (images: IterableIterator<tf.Tensor3D>) => {
const loop = async () => {
if(net) {
if(frame % computeRecognitionEveryNFrames === 0){
const nextImageTensor = images.next().value;
if(nextImageTensor){
const objects = await net.classify(nextImageTensor);
console.log(objects.map(object => object.className));
tf.dispose([nextImageTensor]);
}
}
frame += 1;
frame = frame % computeRecognitionEveryNFrames;
}
requestAnimationFrame(loop);
}
loop();
}++/code>++code data-line-start="1" data-line-end="20">++/code>++/pre>
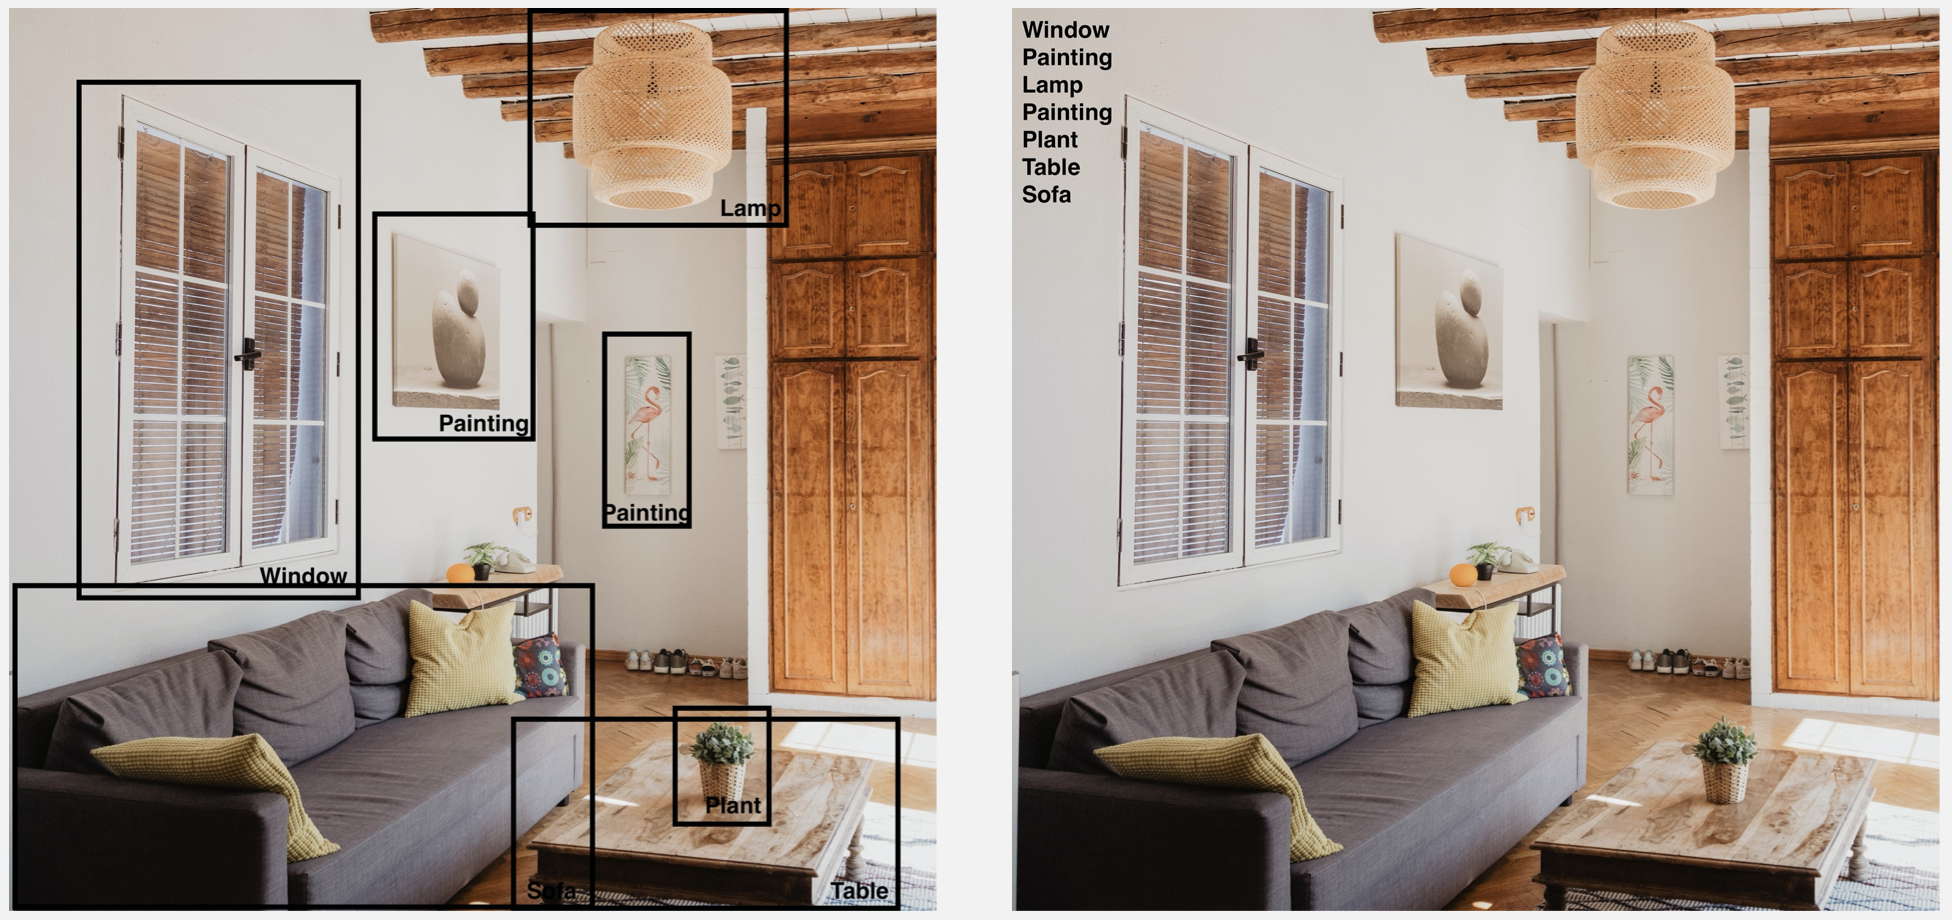
You may have noticed that the title of this article includes "recognise" whilst the video I have based my adaptation on is about the "detection" of an object.
If you look on the internet for object detection, you will end up on a library named @tensorflow-models/coco-ssd.

Hmm? object recognition? object detection? what is the difference? Object recognition allows you only to know which objects are depicted on the image while object detection gives you additional information: the position of each object in the image.
If object detection is better, why didn't I tell you to go for it in the first place? When you use coco-ssd detect method, you receive a warning advising you to use tf.nonMaxSuppressionAsync() instead of tf.nonMaxSuppression() and, if you bypass this warning, your application is drastically slowed down.

In my understanding, the async version has higher performances but is not yet used in coco-ssd. This warning is mainly for people who have used Tensorflow to develop and train their own models. You could try to patch the library to use the correct method but it is troublesome since you want to change a synchronous function into an asynchronous function. That is where mobilenet comes into play. Take a moment to think whether you need to know the position of each object to do your project or not. If the answer is no, then do not bother with coco-ssd.
I hope that this summary was helpful and that it helped you on your quest for object recognition. Remember that sometimes a good compromise is better than no working solution. As for me, I am diving back into Augmented Reality with my new application.


Le BAM Innovation Lab, pour rester à la pointe des dernières innovations tech et produit !


