
Adresse
1 rue de Saint-Petersbourg75008 Paris
Mail
contact@bam.techTéléphone
+33 (0)1 53 24 00 83When running Flutter tests on our CI for our latest project, we encountered some problems with an undesirable golden difference. Indeed, goldens don’t render the same on a Linux machine and a macOS machine. This is due to the font smoothing not being the same on both operating systems.
As all of us in the team work on a macOS machine, our first approach was to run golden tests on macOS machines to ensure consistency when our tests run on the CI. Unfortunately, CI costs for macOS machines are more expensive, sometimes even ten times more expensive in the case of GitHub Actions:

Our second approach was to run goldens on our local machine with a pre-commit hook and then skip them on the CI, to be able to run tests on a Linux CI. But we can sometimes forget to update our goldens locally and then you have tests failing on the main branch 😵.
So we had to come up with another solution, and that’s what I want to present to you in this article as follows:
The solution we came up with is to run both local and CI tests in the same environment. If this environment cannot be macOS as the pricing is way too high, we are going to choose Linux, leveraging the power of Docker. This way, goldens tests will render the same on both our environments, and if another developer with a Linux or Windows machine were to join us, they would be able to run tests on their local machine, which is kind of important.
To do so, you have to download Docker on your local machine.
Then you must configure a Docker image: you simply want to start from an Ubuntu machine and install Flutter on it.
Create a ++code>Dockerfile++/code> and put it in a ++code>docker++/code> folder at the root of your project folder, it should look like that:

++pre>++code class="language-bash">
# Need to match the version of Linux your CI is running on
FROM ubuntu:20.04
# Prerequisites
ARG DEBIAN_FRONTEND=noninteractive
ENV TZ=Europe/Paris
RUN apt update && apt install -y curl git unzip xz-utils zip libglu1-mesa openjdk-8-jdk wget
# Set up new user
RUN useradd -ms /bin/bash developer
USER developer
WORKDIR /home/developer
# Download Flutter SDK
ARG flutter_version
RUN git clone https://github.com/flutter/flutter.git -b ${flutter_version}
ENV PATH "$PATH:/home/developer/flutter/bin"
# Run basic check to download Dark SDK
RUN flutter doctor++/pre>++/code>
Passing ++code>flutter_version++/code> as an argument allows you to match the flutter version installed on your computer without bumping this by hand each time there is a new update. You can get this using the following command:
++pre>++code class="language-bash">flutter --version | grep -o '[0-9|\.]*'
# Output: 3.3.2
++/pre> ++/code>You can now build your Docker image using:
++pre>++code class="language-bash">
docker build --build-arg flutter_version=$(flutter_version) -t docker_tests $(project_dir)/docker/
++/pre> ++/code>
Where ++code>project_dir++/code> is the path to your project folder, you can get it with:
++pre>++code class="language-bash">git rev-parse --show-toplevel
# Output: /Users/louisdachet/Developer/BAM/flutter-bam++/pre> ++/code>
The ++code>-t docker_tests++/code> option is used to give a name to your image and be able to reuse it afterward.
Now that the Dockerfile is ready, let’s move on to the next part: access the project file inside the container.
You can now run your built docker image like so:
++pre>++code class="language-bash">docker run docker_tests++/pre> ++/code>
What you want to do next is to share our project folder between our local machine and the Docker machine. This way, you are still able to edit our files while the tests run on the Docker machine.
To do this, the Docker documentation recommends using the ++code>-v flag++/code>, like so:
++pre>++code class="language-bash"> docker run -v path/on/my/local/machine:path/on/my/docker/machine docker_tests++/pre>++/code>
In our case, we want to share with the container, the following folders:
++pre>++code class="language-bash">which flutter | rev | cut -c12- | rev
# Output: /Users/louisdachet/Developer/flutter/ ++/pre>++/code>
The last two are very useful in order not to have to run flutter pub get on the Docker container before each test. If you do not share those, you will get the following error when running the tests: Compilation failed for file ....
Finally, to tell flutter where the pub cache is located, the ++code>PUB_CACHE++/code> environment variable has to be set to the same folder you shared the pub cache on the Docker container, in our case ++code>/cache.++/code>
The final command should look like this:
++pre>++code class="language-bash">docker run -ti -v $(project_dir):/project -v $(flutter_dir):$(flutter_dir) -v ~/.pub-cache:/cache -e PUB_CACHE="/cache" docker_tests ++/pre>++/code>
Your Docker environment is now ready to be used, let’s move on to the next part: the test scripts.
Now that all of our project files are shared with Docker to the path: ++code> /project/ ++/code>, we need to create the following ++code>docker_test.sh++/code> file in the ++code>docker++/code> folder:
++pre>++code class="language-bash">#!/usr/bin/env bash
packagePath=${packagePath:-}
cd $packagePath
flutter test --no-pub --test-randomize-ordering-seed random
exit++/pre>++/code>
This file will be executed in the Docker container and is responsible for launching your tests as you usually do with the flutter test ... command, only with a few additional options that we fancy. Now to execute the tests, run the following command:
++pre>++code class="language-bash">docker run -ti -v $(project_dir):/project -v $(flutter_dir):$(flutter_dir) -v ~/.pub-cache:/cache -e PUB_CACHE="/cache" docker_tests /bin/sh -c "/project/docker/docker_test.sh --packagePath /project/flutter_bam"++/pre>++/code>
This is quite long, isn’t it?
Don’t worry, be sure to check the General Improvements part to learn how to execute tests more quickly and more easily with a makefile.
We want to be able to pass extra arguments to the ++code>flutter test++/code> command to do things such as:
To do so, let’s update the ++code>docker_test.sh++/code> file to add the new arguments:
++pre>++code class="language-bash">#!/usr/bin/env bash
packagePath=${packagePath:-}
testPath=${testPath:-}
updateGoldens=${updateGoldens:-}
coverage=${coverage:-}
# 1. If the first argument is --update-goldens, then updateGoldens is set to --update-goldens
# 2. If the first argument is --coverage, then coverage is set to --coverage
# 3. If the first argument is --packagePath, then packagePath is set to the second argument
# 4. If the first argument is --testPath, then testPath is set to the second argument
# 5. If the first argument is not --update-goldens or --coverage, then shift to the next argument
while [ $# -gt 0 ]; do
if [ "$1" == "--update-goldens" ]; then
declare= updateGoldens="--update-goldens"
shift
elif [ "$1" == "--coverage" ]; then
declare= coverage="--coverage"
shift
elif [[ $1 == *"--"* ]]; then
param="${1/--/}"
declare $param="$2"
shift
shift
else
shift
fi
done
cd $packagePath
flutter test $testPath $updateGoldens $coverage --no-pub --test-randomize-ordering-seed random
exit ++/pre>++/code>
You can just add the wanted arguments as you like when you run the tests
++pre>++code class="language-bash">docker run -ti -v $(project_dir):/project -v $(flutter_dir):$(flutter_dir) -v ~/.pub-cache:/cache -e PUB_CACHE="/cache" docker_tests /bin/sh -c "/project/docker/docker_test.sh --packagePath /project/flutter_bam --update-goldens --coverage"++/pre>++/code>
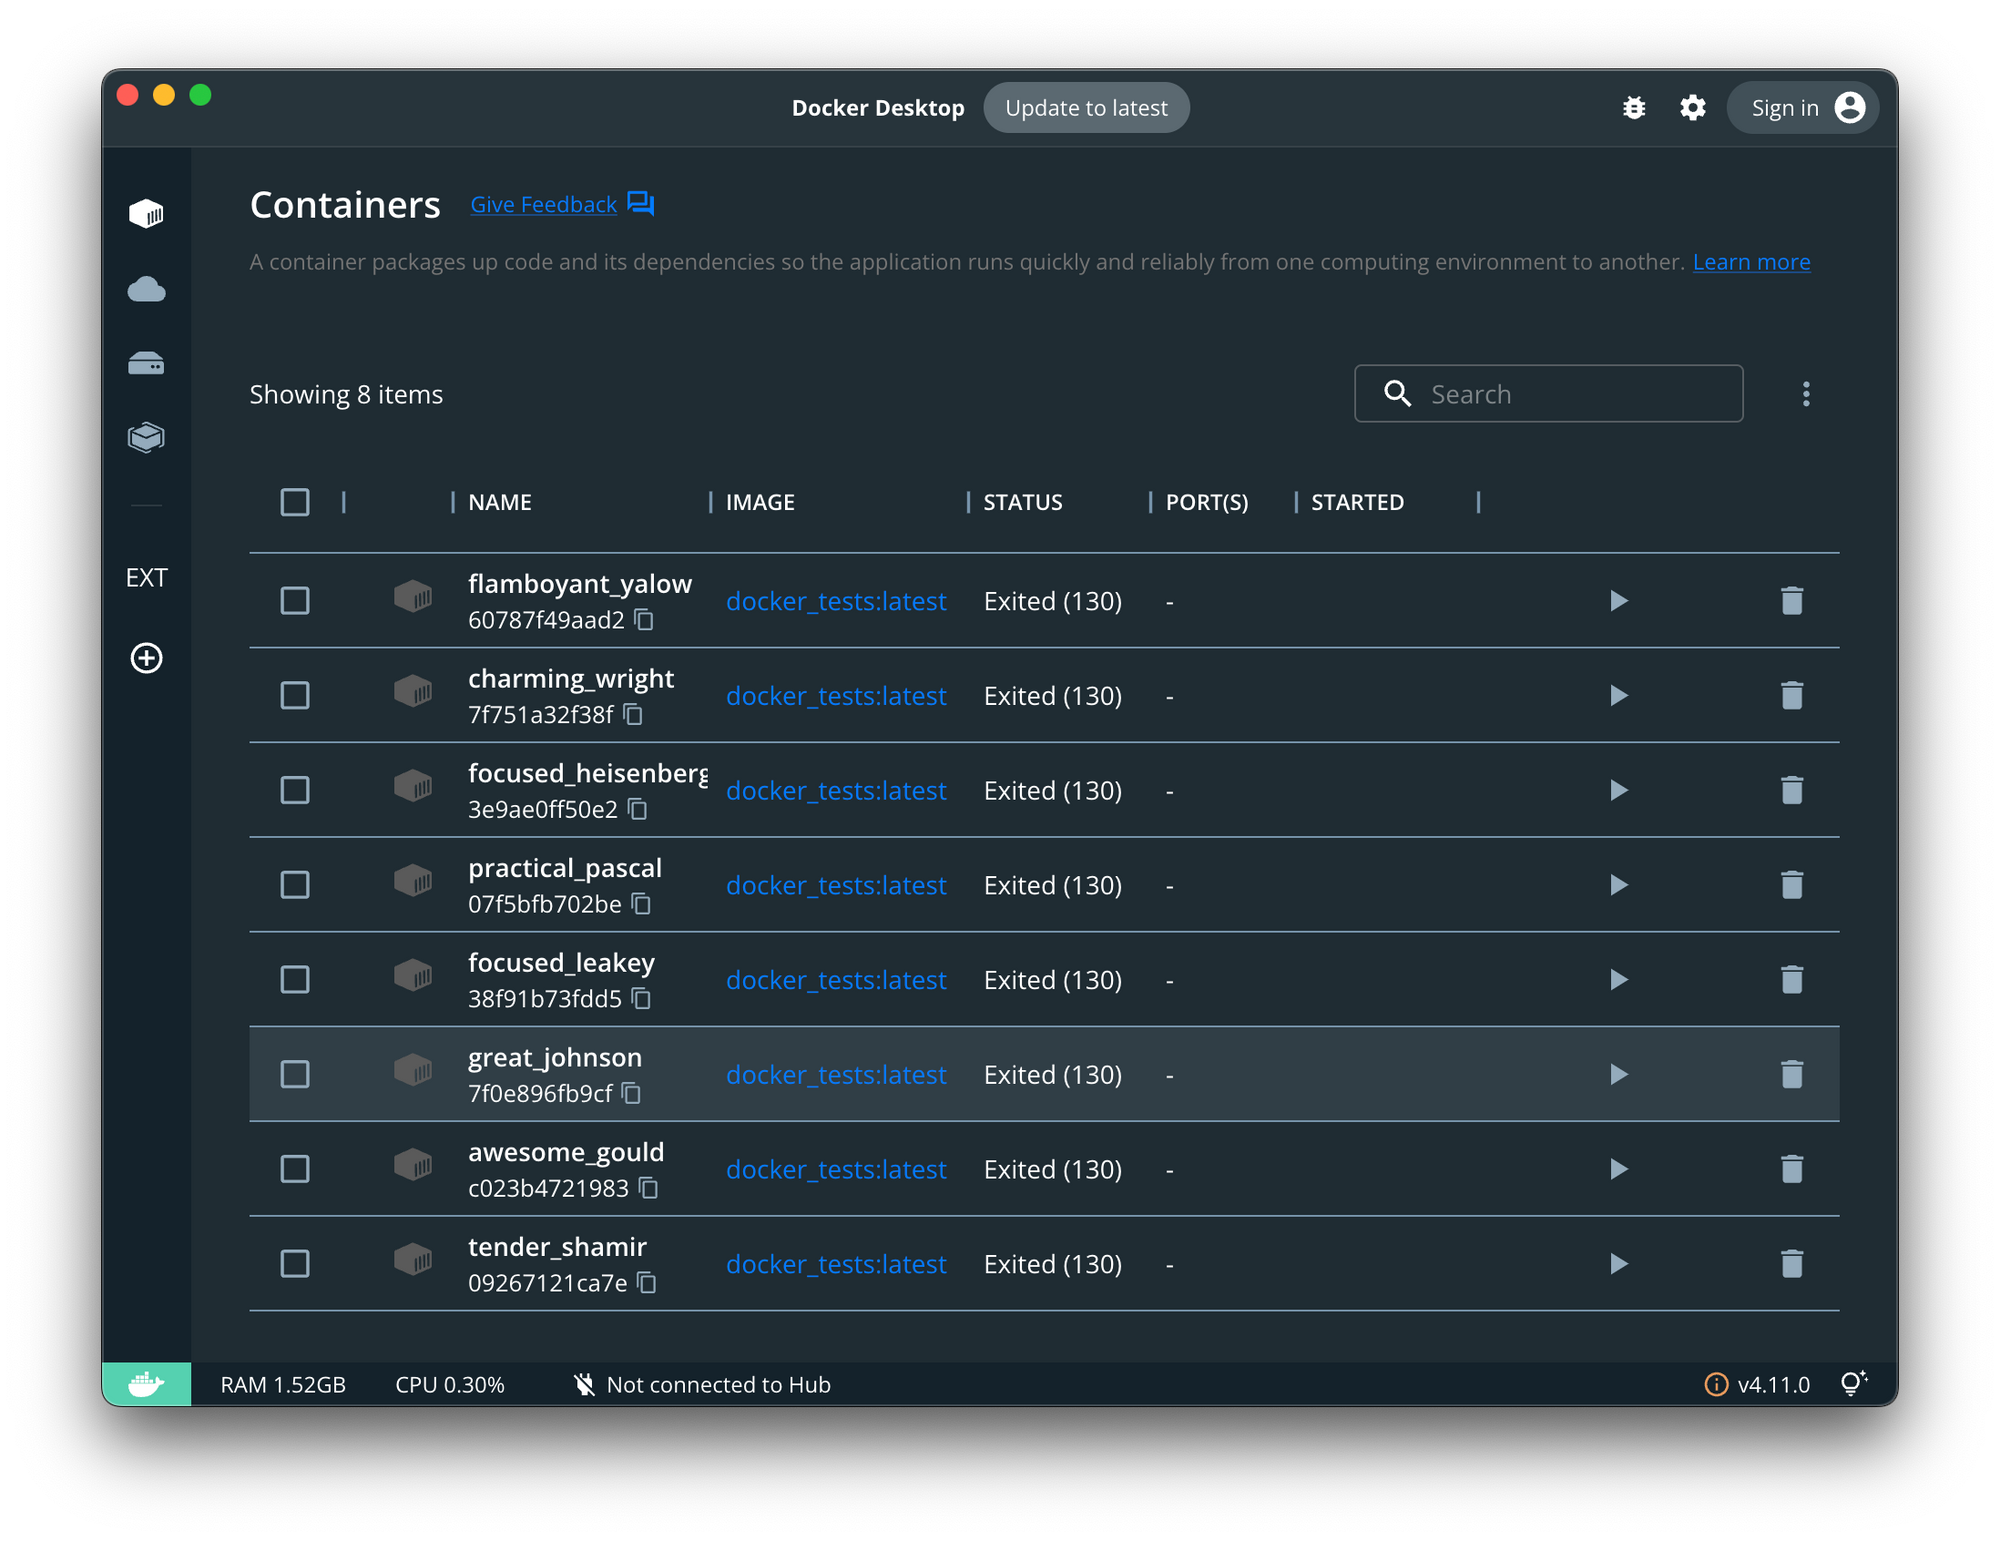
You probably want to remove the container automatically once the script has ended, which is kind of a good thing if you don’t want your Docker dashboard to look like this:

This can be done by adding the ++code>--rm++/code> flag in the options of the ++code>docker run++/code> command :
++pre>++code class="language-bash">docker run -ti --rm [OTHER OPTIONS] docker_tests++/pre>++/code>
Finally, if you want to shorten the commands used to run the tests, this can be done by creating a Makefile at the root of your project. Simply create a file and name it ++code>Makefile++/code> without extension.
All variables such as ++code>flutter_version++/code> or ++code>flutter path++/code> will be stored in it. Make sure to replace the ++code>flutter_bam++/code> name with your project name.
++pre>++code class="language-bash"># We set the path of the flutter installation on the local machine to share it with the docker container
flutter_dir = $$(which flutter | rev | cut -c12- | rev)
# We set the path of the current project directory on the local machine to share it with the docker container
project_dir = $$(git rev-parse --show-toplevel)
# We set the flutter version to use the same in the docker container
flutter_version = $$(flutter --version | grep -o '[0-9|\.]*')
# Base command to run the docker container
docker_cmd := docker build --build-arg flutter_version=$(flutter_version) -t docker_tests $(project_dir)/docker/ && docker run -ti --rm -v $(project_dir):/project -v $(flutter_dir):$(flutter_dir) -v ~/.pub-cache:/cache -e PUB_CACHE="/cache" docker_tests
# We get every argument after the make command
RUN_ARGS := $(wordlist 2,$(words $(MAKECMDGOALS)),$(MAKECMDGOALS))
# We check if the update-goldens option is given
ifeq ($(findstring update-goldens,$(RUN_ARGS)),update-goldens)
update-goldens="--update-goldens"
else
update-goldens=""
endif
# We check if the coverage option is given
ifeq ($(findstring coverage,$(RUN_ARGS)),coverage)
coverage="--coverage"
else
coverage=""
endif
# We check if a testPath option is given
testPath = $(filter test/%.dart,$(RUN_ARGS))
# Test for app
test_app:
(cd flutter_bam && \
$(docker_cmd) /bin/sh -c "/project/docker/docker_test.sh --packagePath /project/flutter_bam --testPath $(testPath) $(update-goldens) $(coverage)") ++/pre>++/code>
All you have to do next is run ++code>make test_app++/code> in your terminal and wait for the test execution to complete. If you want more specific options such as updating the goldens or checking code coverage, just run ++code>make test_app update-goldens coverage++/code>.
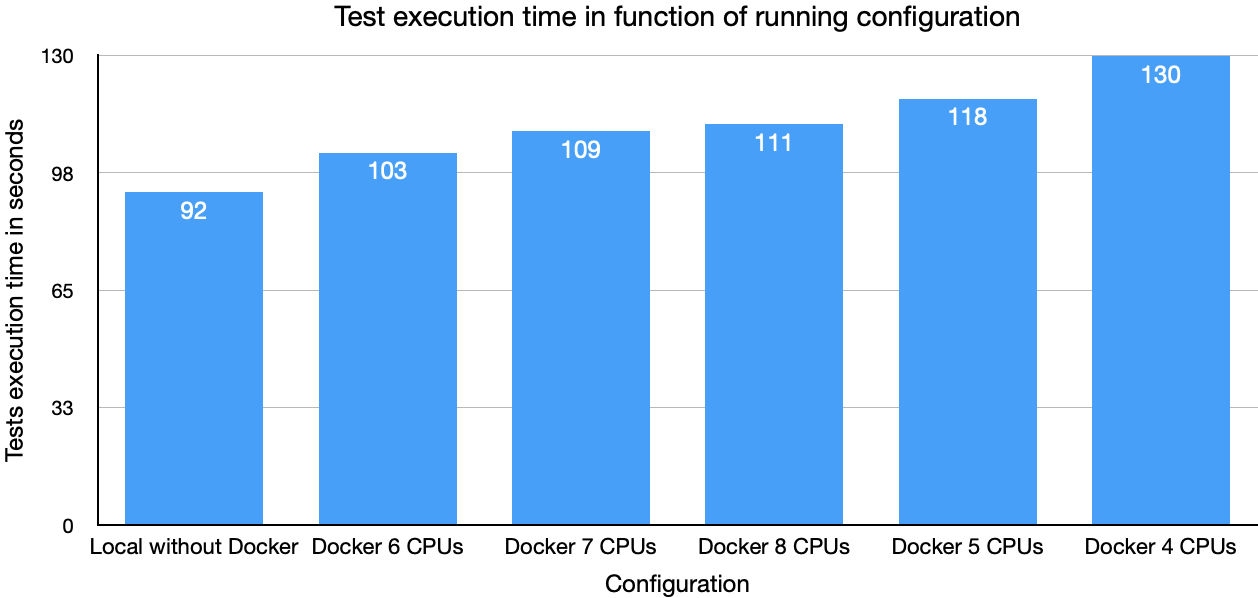
On the project we initially tested this solution, there are 622 tests. Running those tests the “normal” way directly on macOS takes 1 minute and 32 seconds on my M1 Pro MacBookPro. Running them in a Docker container on the same machine takes 1 minute and 43 seconds, which is 11 seconds more or ~12% more.
Using Docker, you can configure the resources allocated to a container in the resources preference panel. The following graphic shows how much time it takes to run the tests according to the configuration we’re running them with:

Strange thing, the most efficient to run the tests with Docker is to allocate 6 CPUs to it, no matter how many your computer has. Nevertheless, this is the solution we went for as 11 seconds more to run 622 tests is acceptable.
I hope you enjoyed this article. If so or if you have any questions, please contact me on Twitter at @ldachet.
