


Adresse
1 rue de Saint-Petersbourg75008 Paris
Mail
contact@bam.techTéléphone
+33 (0)1 53 24 00 83You probably know Bluetooth? So first, remember that Bluetooth Low Energy (BLE) is not the same at all as Bluetooth Classic! What are the differences? Mainly the consumption! Indeed, the Bluetooth LE consumes from 2 to 4 times less than Bluetooth Classic. So it is the perfect candidate for the Internet of Thing (IoT) devices which could be autonomous up to 5 years while broadcasting data!
What you should remember is that both technologies use the 2.4 GHz frequency band. The Bluetooth LE can support data rate from 125 kb/s to 2 Mb/s and is particularly appropriate for IoT applications. It is used into smartwatches, hearth rate sensors, sensors for the industry, connected lightbulbs, etc...
The Bluetooth SIG (the organization who writes the standard) described how to communicate with a Bluetooth LE module. To do so they implemented the GATT profile (Generic Attribute Profile) to maximize the benefit of the BLE system. This profile describe how to communicate between a central (e.g. you phone) and a peripheral (e.g. the sensor).
You can read the differences between the serial port UART and the GATT profile here.
With the GATT communication profile, you can see a Bluetooth LE (BLE) chip as a group of services (like an API with routes), which have characteristics for each of them. Finally each characteristics have descriptors.
Each service provides some features to the BLE module (battery level, elevation, hearth rate, etc...). Each service has characteristics which are properties of it. You can read/write/subscribe on these characteristics (the value of the battery level, the name of the battery manufacturer, etc...). To describe what are these characteristics, there are the descriptors for each of them. These descriptors are characteristic metadata. They give more information about them (measure unit, standard, etc..).
I will illustrate this with a simple use case. I have a flower at home, and I would try to keep it alive longer than the previous one (I forgot to water it... 🍂). I bought a humidity sensor to detect if the flower need to be watered or not. This sensor has a BLE module with the following architecture:
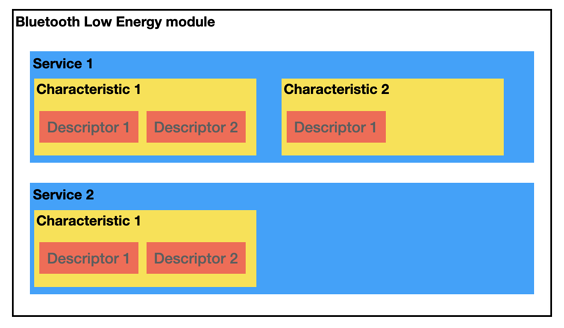
The first service is the service allocated to the battery information. The second one is relative to the humidity measure of my flower's earth. Let's focus on the second characteristic we are interested in. I can read the second service's characteristic to get the humidity value measured by the sensor. The sensor can write on the characteristic the value it measures, then I can read the value with my phone to get this value.
To read a characteristic, you have to follow this communication scheme:
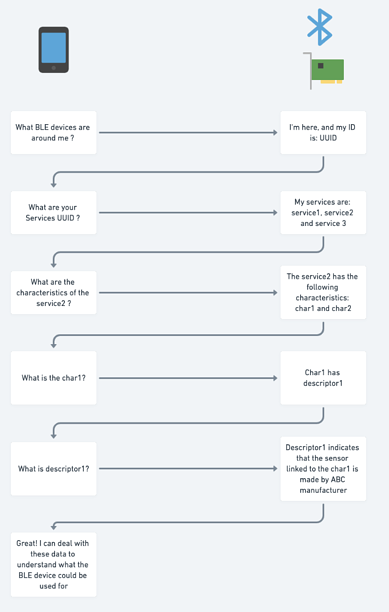
All these steps take quite a long time. Indeed, it is a trade-off of BLE: all communication are asynchronous, and we can receive just a few information each time.
You can read more about GATT profile on this article.
What are we going to do? The target application is an app which can:
Let's build a BLE object with an Arduino board! What is an Arduino? According to the official website:
❓
Arduino is an open-source electronics platform based on easy-to-use hardware and software. Arduino boards are able to read inputs - light on a sensor, a finger on a button, or a Twitter message - and turn it into an output - activating a motor, turning on an LED, publishing something online.
For this tutorial I'll use the following hardware:
Connect the BLE module to the Arduino Uno. Then connect a RGB led which will be used to inform the user about the BLE module status.
++table style="width: 100%; border-color: #99acc2; border-style: none; border-collapse: collapse; table-layout: fixed;" cellpadding="4" border="0">++tbody>++tr>++td style="width: 50%;">

++/td>++td style="width: 50%;">

++/td>++/tr>++/tbody>++/table>
ℹ️
The black wire linked to the RGB led is connected to the anode, the longer leg of my led. But be careful! The circuit could change if your RGB led is not the same than mine. Some RGB led must be connected to the 5V pin by the cathode leg. Look at this article for further information.
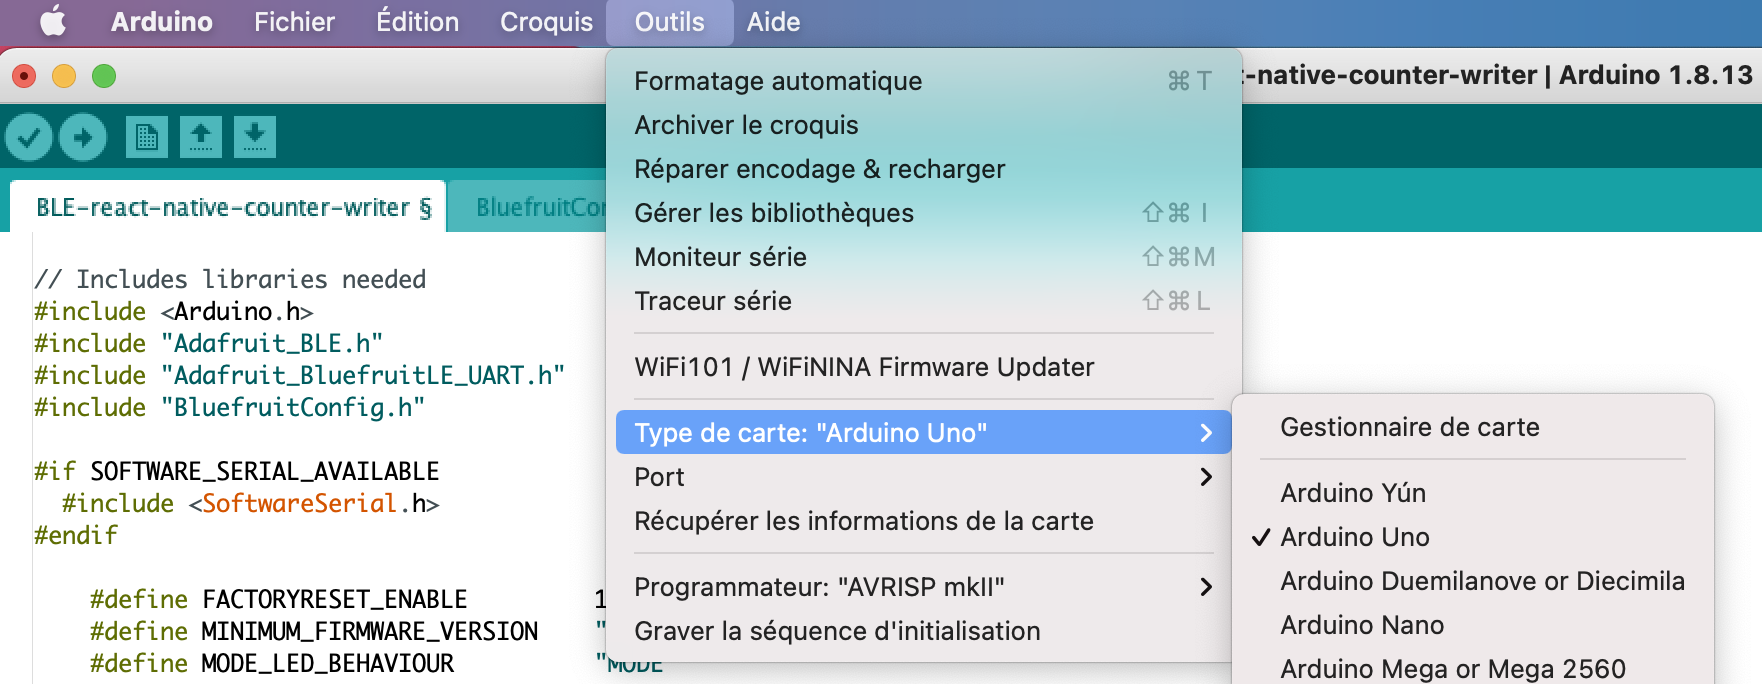
Open the Arduino IDE then create a new sketch and save it.
You should have the following code base:
++pre id="6baeafa9-21ef-48e6-b745-a5fa41cbea70" class="code">++code>void setup() {
// put your setup code here, to run once:
}
void loop() {
// put your main code here, to run repeatedly:
}++/code>++/pre>

Lets focus on the ++code>loop++/code> function to add some features to our Arduino module.
Let's code the React Native application to read and write on the BLE module!
First you need the React Native environment to develop a React Native application. You can follow this article or the official documentation.
Then you can initialize your app by creating a folder for your code and execute:
++pre id="64f11bfe-7bbd-47c2-a373-104c6d904a1b" class="code">++code>npx react-native init BleProject --template react-native-template-typescript++/code>++/pre>
where ++code>BleProject++/code> is the name of your project
Check that your application can be launched correctly:
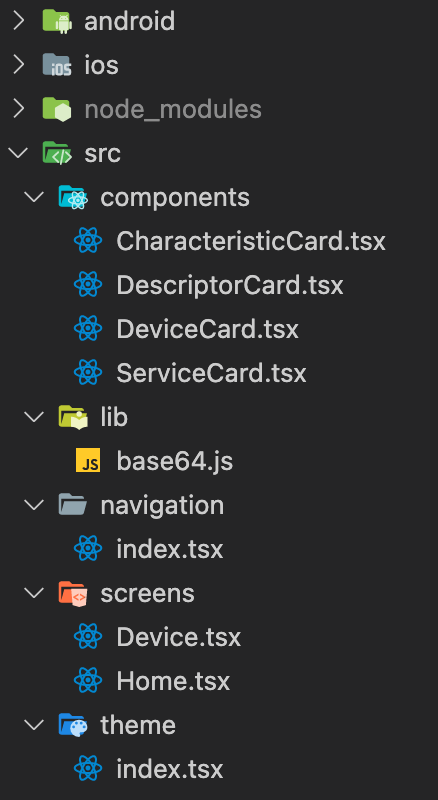
Folder architecture
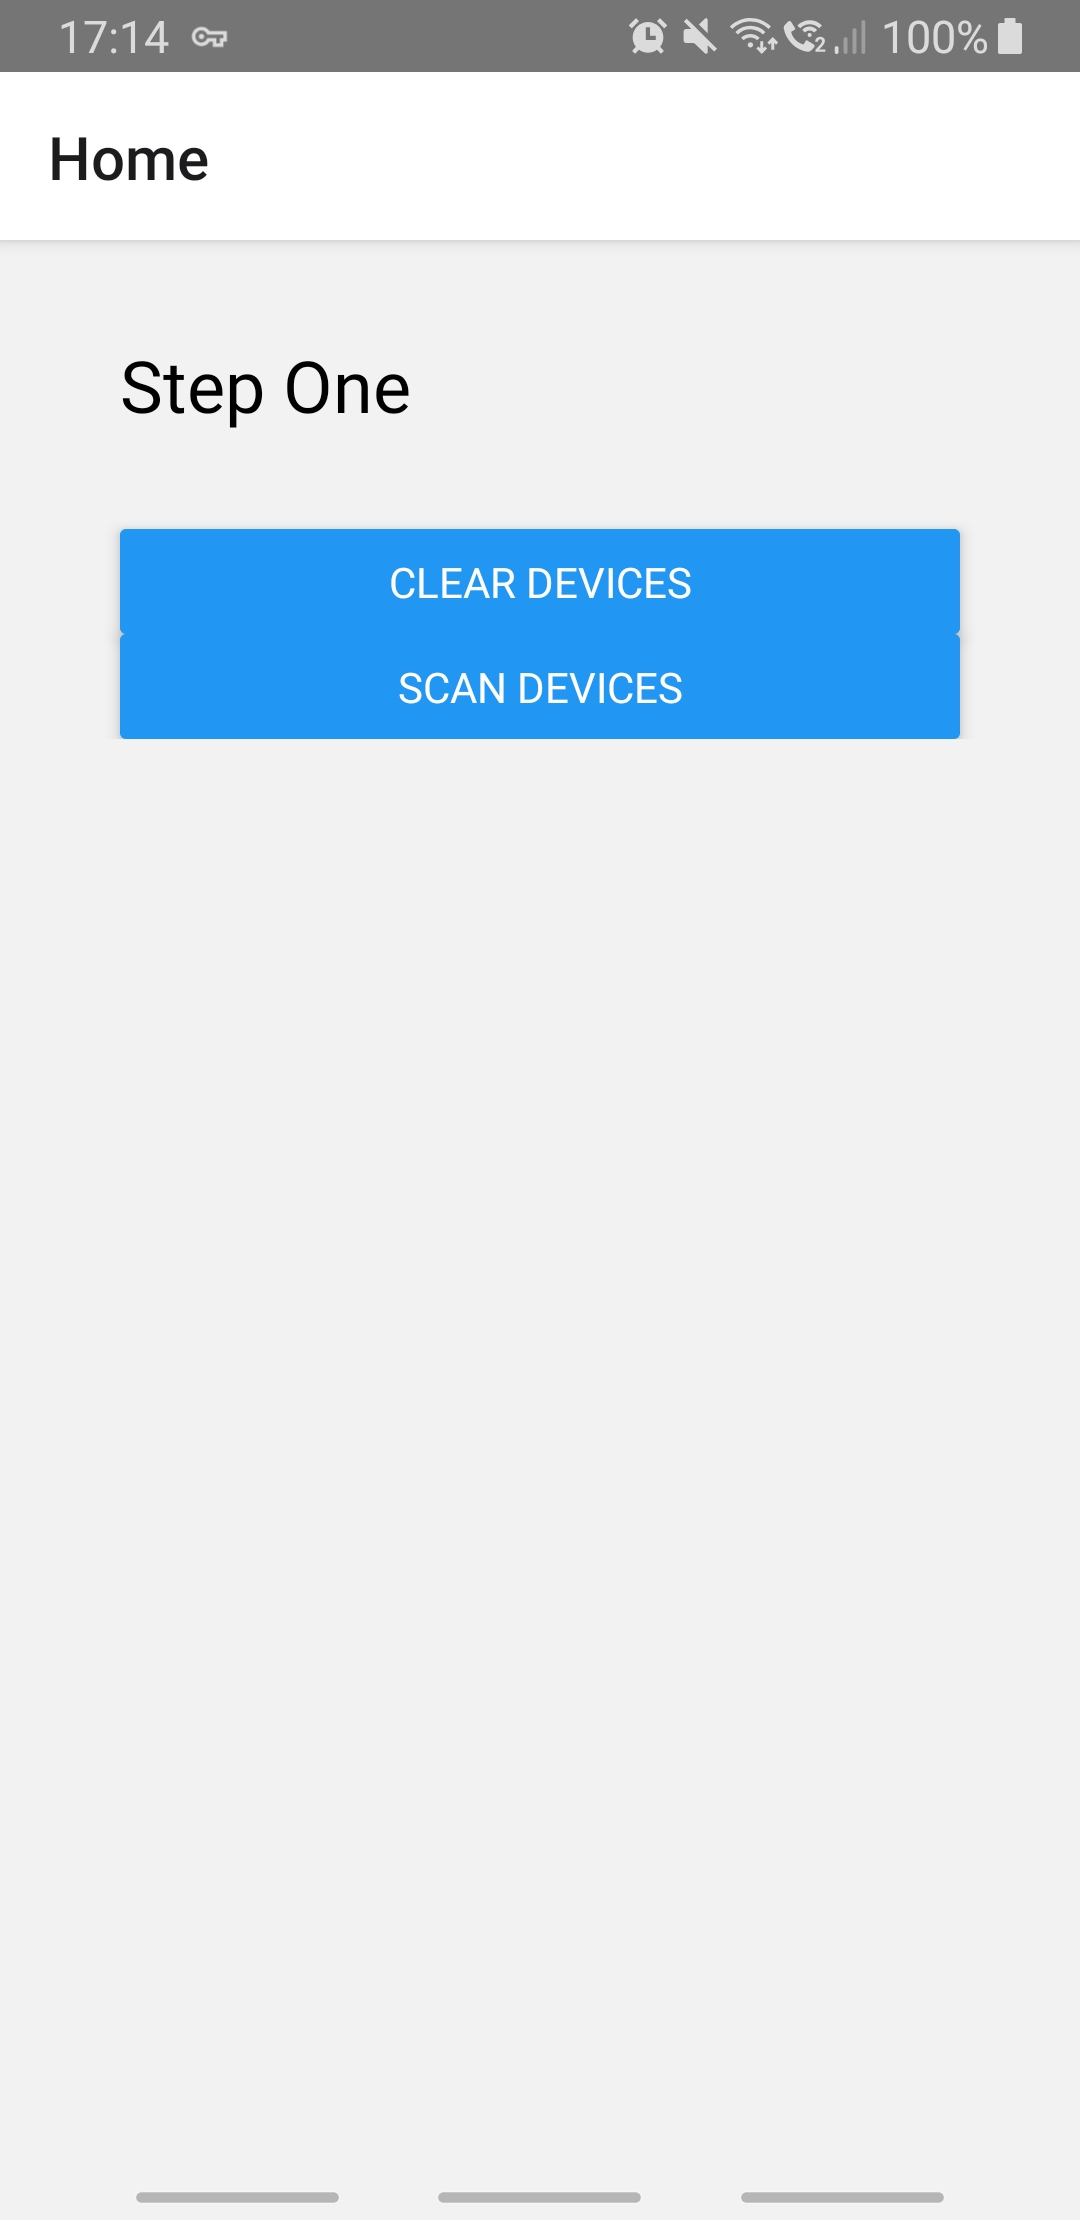
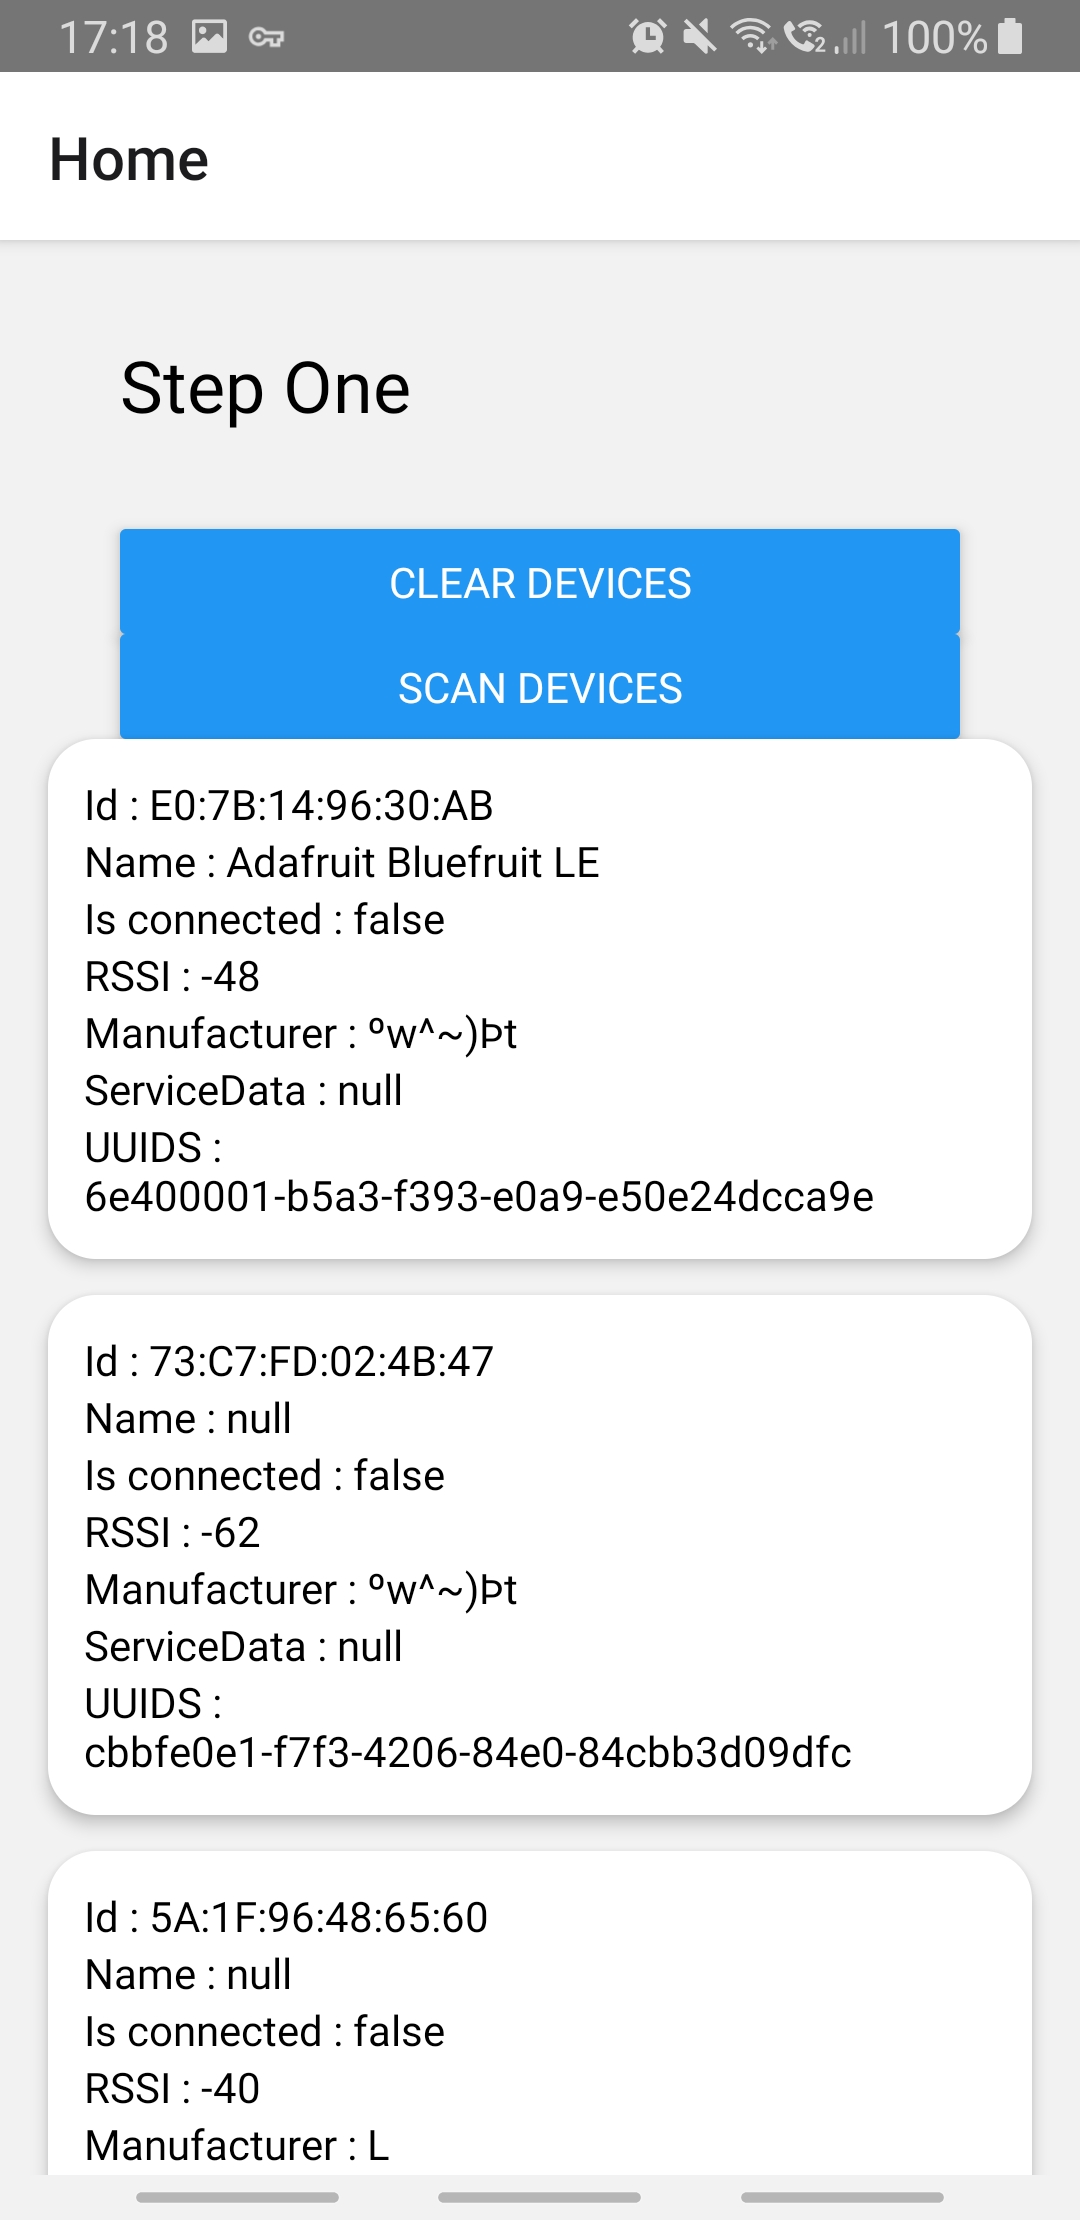
Screen architecture
Here are screenshots of the app at the end of this article. I apologize for the UX/UI, but this is not the subject 😇
++table style="width: 100%; border-color: #99acc2; border-style: none; border-collapse: collapse; table-layout: fixed; height: 276px;" cellpadding="4" border="0">++tbody>++tr style="height: 276px;">++td style="width: 25%; height: 276px;">
++/td>++td style="width: 25%; height: 276px;">
++/td>++td style="width: 25%; height: 276px;">
++/td>++td style="width: 25%; height: 276px;">
++/td>++/tr>++/tbody>++/table>
You see that there are 2 screens the Home screen and the Device screen. Let's begin by adding the react-navigation package to have a navigator and our 2 screens.
You can follow the react-navigation documentation, or see my Github repo with the code. I will focus here on Bluetooth Low Energy features.
Our application will be available to:
Thanks to Polidea which have develop the awesome react-native-ble-plx package we can use the Ble module of our devices with a React Native app without effort!
Install the package on your project by following the Configure & Install section.
This package is a react-native package which uses native Android and iOS module to connect to the hardware and communicate with the phone's BLE module.
ℹ️
Because the package uses native modules, you can't use it with an Expo project. You must eject your project if you want to continue.
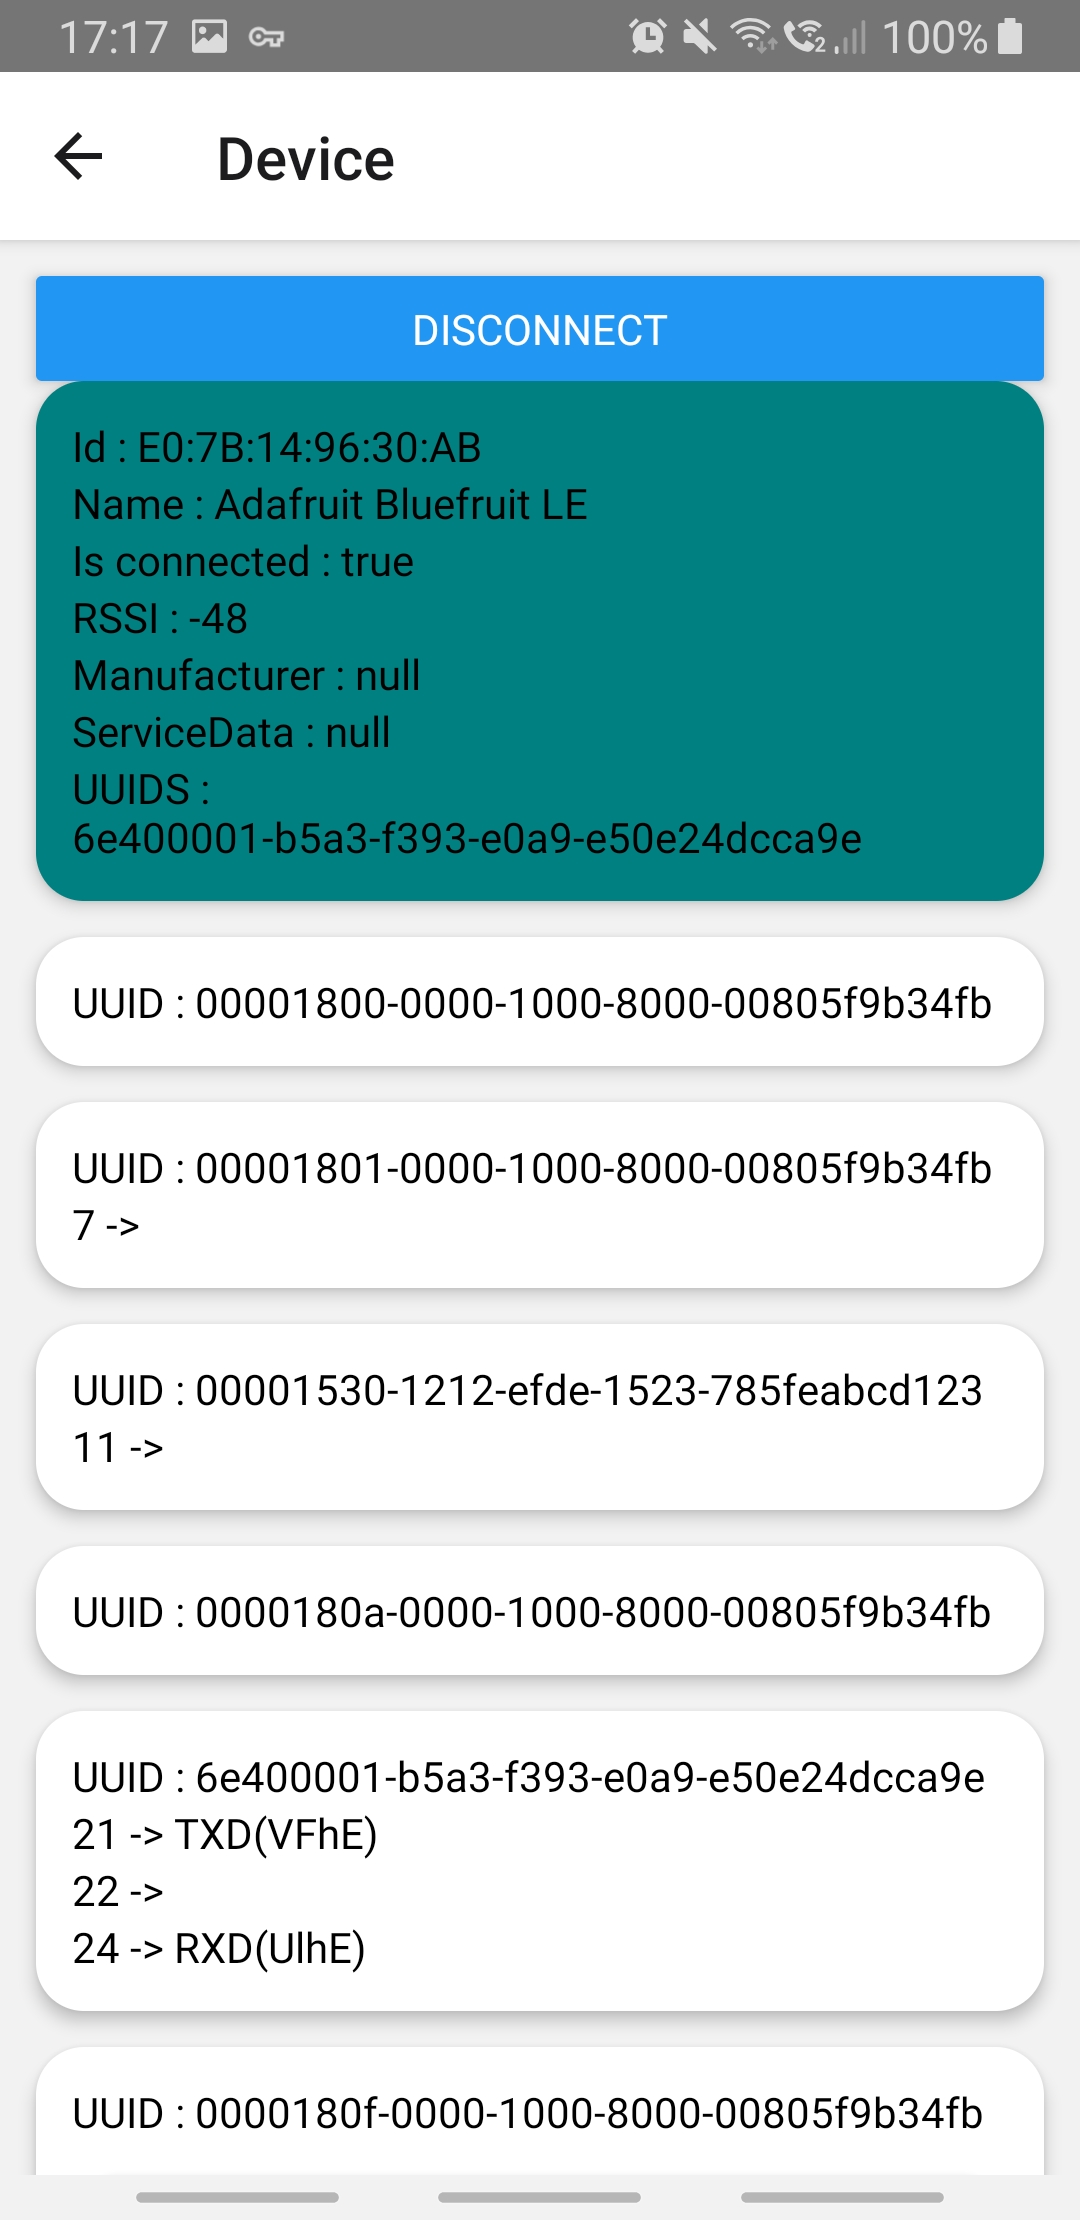
On the device screen we receive the connected device object. With it we can discover more information about it and display it to the user:
++pre id="637b7d97-0591-4a79-9896-36265aa48d69" class="code">++code>const DeviceScreen = ({
route,
navigation,
}: StackScreenProps<RootStackParamList, 'Device'>) => {
// get the device object which was given through navigation params
const { device } = route.params;
const [isConnected, setIsConnected] = useState(false);
const [services, setServices] = useState<Service[]>([]);
// handle the device disconnection
const disconnectDevice = useCallback(async () => {
navigation.goBack();
const isDeviceConnected = await device.isConnected();
if (isDeviceConnected) {
await device.cancelConnection();
}
}, [device]);
useEffect(() => {
const getDeviceInformations = async () => {
// connect to the device
const connectedDevice = await device.connect();
setIsConnected(true);
// discover all device services and characteristics
const allServicesAndCharacteristics = await connectedDevice.discoverAllServicesAndCharacteristics();
// get the services only
const discoveredServices = await allServicesAndCharacteristics.services();
setServices(discoveredServices);
};
getDeviceInformations();
device.onDisconnected(() => {
navigation.navigate('Home');
});
// give a callback to the useEffect to disconnect the device when we will leave the device screen
return () => {
disconnectDevice();
};
}, [device, disconnectDevice, navigation]);
return (
<ScrollView contentContainerStyle={styles.container}>
<Button title="disconnect" onPress={disconnectDevice} />
<View>
<View style={styles.header}>
<Text>{`Id : ${device.id}`}</Text>
<Text>{`Name : ${device.name}`}</Text>
<Text>{`Is connected : ${isConnected}`}</Text>
<Text>{`RSSI : ${device.rssi}`}</Text>
<Text>{`Manufacturer : ${device.manufacturerData}`}</Text>
<Text>{`ServiceData : ${device.serviceData}`}</Text>
<Text>{`UUIDS : ${device.serviceUUIDs}`}</Text>
</View>
{/* Displays a list of all services */}
{services &&
services.map((service) => <ServiceCard service={service} />)}
</View>
</ScrollView>
);
};++/code>++/pre>
What we can observe is that all BLE class methods are asynchronous methods. It is explained by the physical communication between the phone and the BLE module. It is not instantaneous! So each time you ask for an information you have to wait that the question is asked to the BLE module, then the BLE module has to send you back the answer to your phone.
Finally, we are getting to the end of this long process to read a characteristic 😃
Here is the code of the ServiceCard used in the device screen:
++pre id="c9dc7f08-5697-4c45-86ae-2c6c2c7c3ee1" class="code">++code>const ServiceCard = ({ service }: ServiceCardProps) => {
const [descriptors, setDescriptors] = useState<Descriptor[]>([]);
const [characteristics, setCharacteristics] = useState<Characteristic[]>([]);
const [areCharacteristicsVisible, setAreCharacteristicsVisible] = useState(
false,
);
useEffect(() => {
const getCharacteristics = async () => {
const newCharacteristics = await service.characteristics();
setCharacteristics(newCharacteristics);
newCharacteristics.forEach(async (characteristic) => {
const newDescriptors = await characteristic.descriptors();
setDescriptors((prev) => [...new Set([...prev, ...newDescriptors])]);
});
};
getCharacteristics();
}, [service]);
return (
<View style={styles.container}>
<TouchableOpacity
onPress={() => {
setAreCharacteristicsVisible((prev) => !prev);
}}>
<Text>{`UUID : ${service.uuid}`}</Text>
</TouchableOpacity>
{areCharacteristicsVisible &&
characteristics &&
characteristics.map((char) => (
<CharacteristicCard key={char.id} char={char} />
))}
{descriptors &&
descriptors.map((descriptor) => (
<DescriptorCard key={descriptor.id} descriptor={descriptor} />
))}
</View>
);
};++/code>++/pre>
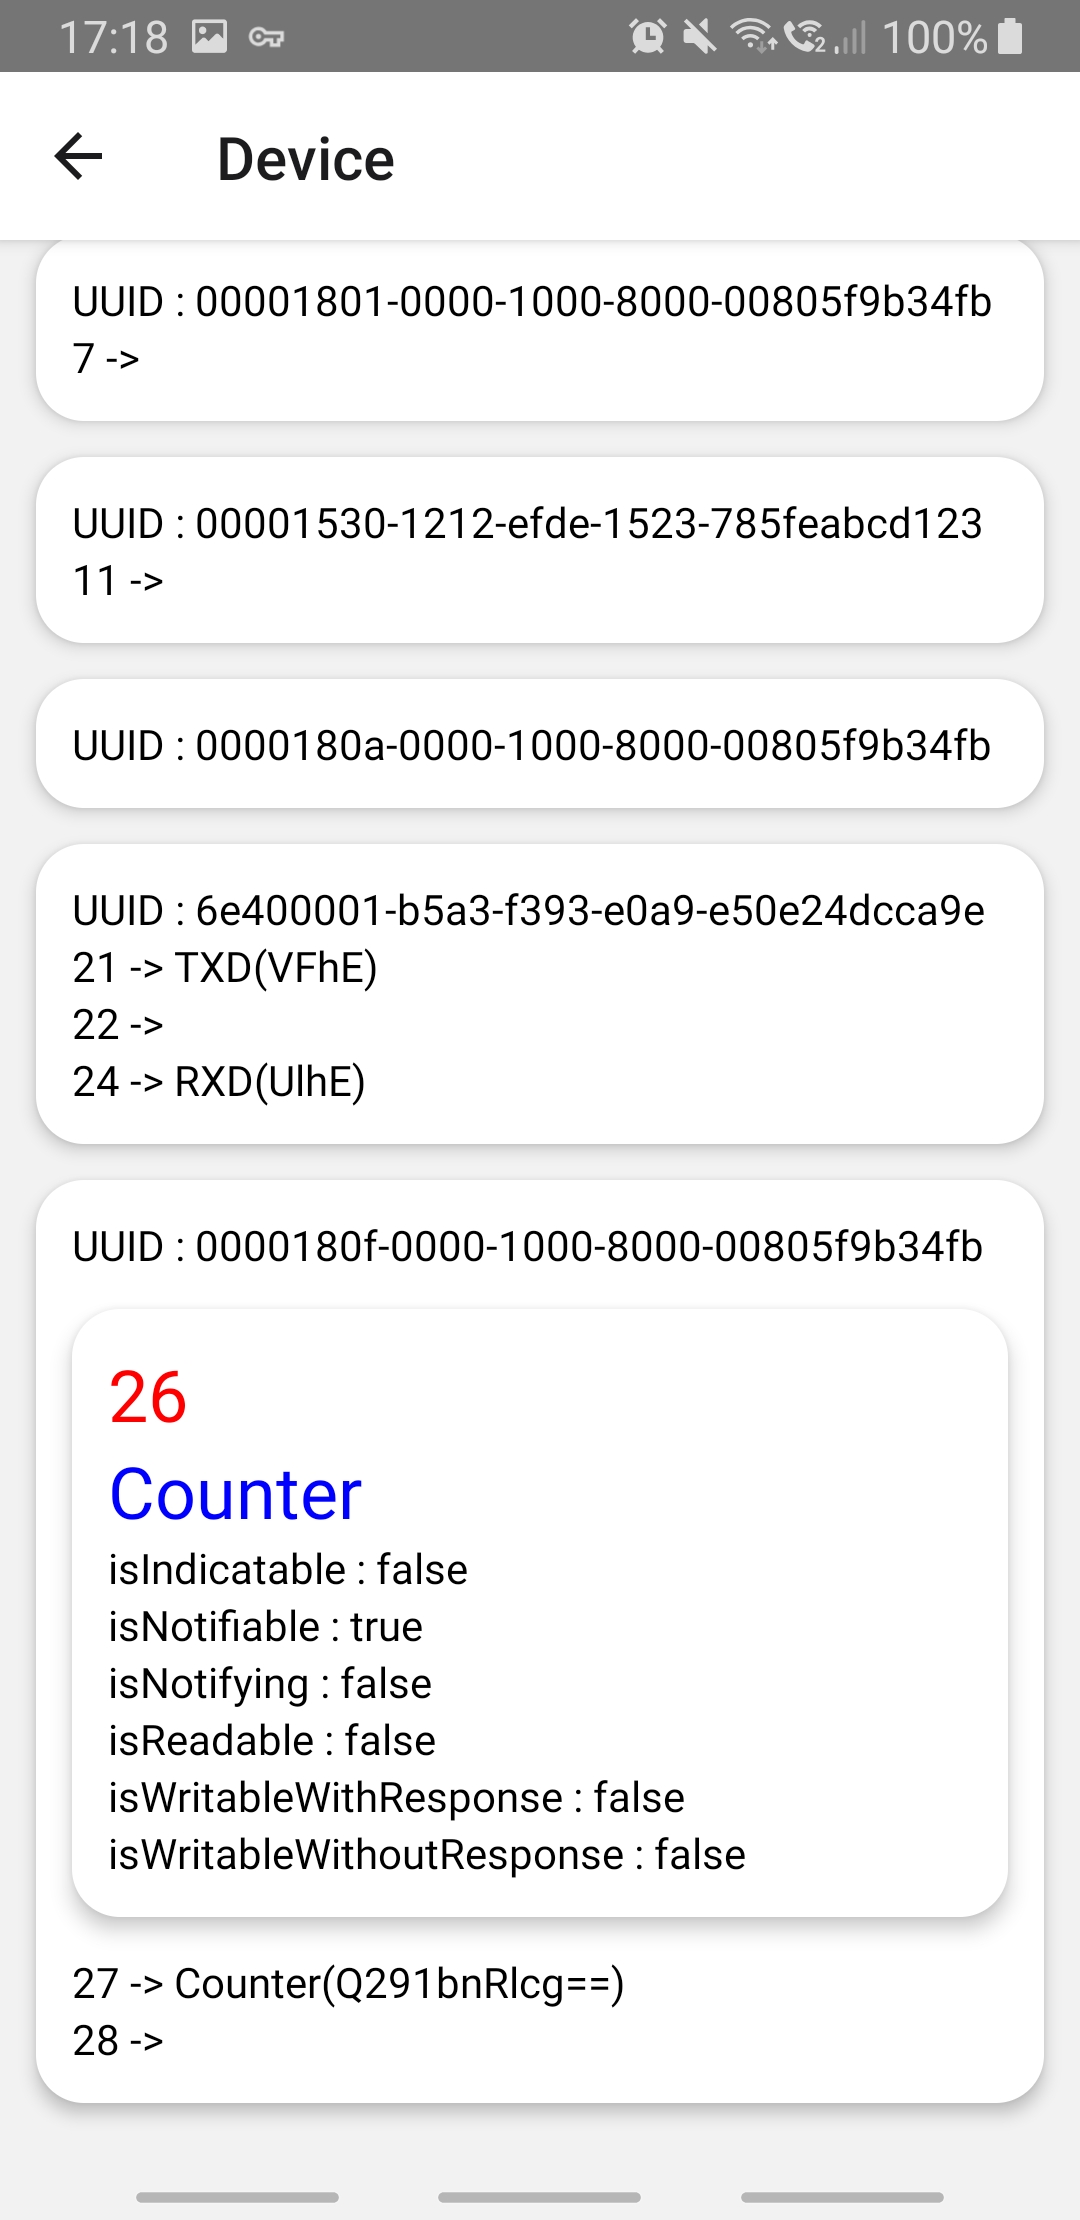
And once you have read the service, you are able to read its characteristic and display them in the CharacteristicCard:
++pre id="11be722f-92b8-4adc-a480-7219969618d6" class="code">++code>const CharacteristicCard = ({ char }: CharacteristicCardProps) => {
const [measure, setMeasure] = useState('');
const [descriptor, setDescriptor] = useState<string | null>('');
useEffect(() => {
// discover characteristic descriptors
char.descriptors().then((desc) => {
desc[0]?.read().then((val) => {
if (val) {
setDescriptor(Base64.decode(val.value));
}
});
});
// read on the characteristic 👏
char.monitor((err, cha) => {
if (err) {
console.warn('ERROR');
return;
}
// each received value has to be decoded with a Base64 algorithm you can find on the Internet (or in my repository 😉)
setMeasure(decodeBleString(cha?.value));
});
}, [char]);
// write on a charactestic the number 6 (e.g.)
const writeCharacteristic = () => {
// encode the string with the Base64 algorithm
char
.writeWithResponse(Base64.encode('6'))
.then(() => {
console.warn('Success');
})
.catch((e) => console.log('Error', e));
};
return (
<TouchableOpacity
key={char.uuid}
style={styles.container}
onPress={writeCharacteristic}>
<Text style={styles.measure}>{measure}</Text>
<Text style={styles.descriptor}>{descriptor}</Text>
<Text>{`isIndicatable : ${char.isIndicatable}`}</Text>
<Text>{`isNotifiable : ${char.isNotifiable}`}</Text>
<Text>{`isNotifying : ${char.isNotifying}`}</Text>
<Text>{`isReadable : ${char.isReadable}`}</Text>
<TouchableOpacity>
<Text>{`isWritableWithResponse : ${char.isWritableWithResponse}`}</Text>
</TouchableOpacity>
<Text>{`isWritableWithoutResponse : ${char.isWritableWithoutResponse}`}</Text>
</TouchableOpacity>
);
};++/code>++/pre>
Youhou! We can read in real time the characteristic value written on our BLE characteristic by our Arduino code 🎉 This is a great achievement we won not without pain. The particular point is to understand that when you read a characteristic, react-native-ble-plx returns its value in the Base64 format. You have to decode it to be able to read it in a human understandable response.
Moreover here I have displayed the characteristic properties: is it notifiable? readable? writable? The one we have created in our Arduino code has the property ++code>0x10++/code> which means that the characteristic can notify each modification, according to the Adafruit documentation. Here I attached a listener on the characteristic with ++code>.monitor++/code> method to get the characteristic value each time it changes.

To go further you can try to control a LED from your phone.
But be aware! You can write only on a writable characteristic! Ensure you have set the right permission to your characteristic when you create it in the Arduino code (++code>0x04++/code> or ++code>0x08++/code> property)
☝
Clue: you'll find the code to write on a characteristic in the code above
We learned how to create a BLE device, how to get notified of each value change. Now you are ready to create your own device with a real life application (not just a blinking led 😉).
The Bluetooth Low Energy is invading our smart objects in our life. Now you know how it works, and how to make your own device! 🚀
Note: You will find all the code above in my github repository


Le BAM Innovation Lab, pour rester à la pointe des dernières innovations tech et produit !


